Skip to content

Category: Quickbooks

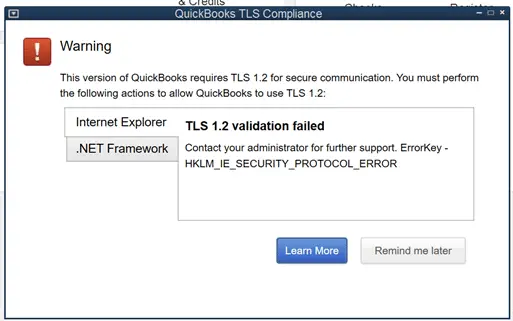
How do I Fix “TLS 1.2 validation failed” error in Quickbooks Pro 2015?

Are you getting a TLS 1.2 Error After Installing Windows 10 April 2018 Update

ErrorKey – HKLM_IE_SECURITY_PROTOCOL_ERROR

Checking off TLS 1.2 in IE probably wont help but luckily there is a fix available.

  1. First, close out of your QuickBooks Desktop application.
  2. Proceed to the second step which is running the TLS 1.2 Readiness tool. This tool helps in updating your system to become TLS 1.2 compliant, so it meets all Windows Operating System, Internet Explorer and .Net requirements. This tool is available from Intuit.
  3. Finally reopen your QuickBooks Application again and your error should be gone.

Please take note that QuickBooks Desktop 2015 is no longer supported by Intuit. You may receive errors when updating the program and eventually may have other issues.

What is TLS? – Transport Layer Security Protocol

Schannel supports versions 1.0, 1.1, and 1.2 of the Transport Layer Security (TLS) protocol. This protocol is an industry standard designed to protect the privacy of information communicated over the Internet. TLS assumes that a connection-oriented transport, typically TCP, is in use. The TLS protocol allows client/server applications to detect the following security risks:

  • Message tampering
  • Message interception
  • Message forgery

The full specification of the TLS Protocol is available from the IETF website: http://www.ietf.org/rfc/rfc2246.txt.

Quickbooks 2018 Shows Past Due on All Invoices

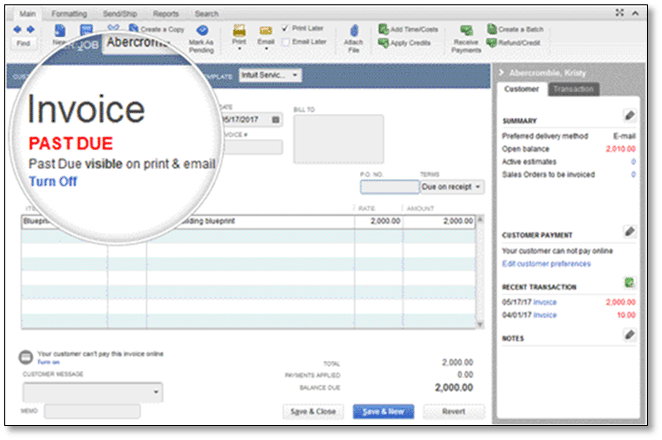
New Quickbooks Invoice past due stamp feature

Quickbooks 2018 v.18 now shows past due on all invoices on your screen.  Don’t panic, by default this will not print on the invoices you’re sending to your customers. While many people will find this annoying at first, showing a “Past Due” stamp helps you identify these invoices so you can take action and minimize delayed collection of dues.  I do think that Quickbooks should have a toggle switch to turn off this feature if unwanted but until then rest assured your customer will not get this stamp unless you want them to.

If you want to show the Past Due stamp on printed invoices

You can also email and print these invoices with the stamp to send to your customers.

Important: The Past Due stamp can only be turned on or off on a template level setting.

Add the Past Due stamp on invoices

Note: There are different ways to add the Past Due stamp.

Add the Past Due stamp from the Templates list

  1. Go to Lists Templates.
  2. From the list, find and edit the invoice template you use for collections.
  3. From the Company & Transaction Information section, check the box Print Past Due Stamp.
  4. Click OK.
  5. Open an invoice that is past its due date. The PAST DUE stamp shows on the invoice.
  6. You may print the invoice or send it through email.

Add the Past Due stamp directly from the invoice

  1. Open an invoice past its due.
  2. Click Formatting and click Manage Templates.
  3. Select the invoice template you want to use and click OK.
  4. From the Company & Transaction Information section, click to check the box Print Past Due Stamp.
  5. Click OK.
  6. You may print the invoice or send through email with the PAST DUE stamp.

Turn off the Past Due stamp

  • If you are on the Basic Customization window, click to uncheck the Print Past Due Stamp box.
  • If you have the past due invoice open, simply click the Turn Off link to remove the Past Due stamp.
Skip to content