Microsoft Windows 7 And 8 OneDrive Support Is Ending

Are you a OneDrive user running Windows 7, Windows 8, or Windows 8.1? If so be aware that on January 1st, 2022 your OneDrive desktop application will reach end of support.

The company offered the following by way of explanation:

“In order to focus resources on new technologies and operating systems and to provide users with the most up-to-date and secure experience beginning January 1, 2022, updates will no longer be provided for the OneDrive desktop application on your personal Windows 7, 8, and 8.1 devices.

Personal OneDrive desktop applications running on these operating systems will stop syncing to the cloud on March 1, 2022. After March 1st, 2022 your personal files will no longer sync and should be uploaded/accessed directly on OneDrive for web.”

The good news is that your OneDrive files aren’t going anywhere. So you don’t have to worry about finding a new cloud-based file storage system. This is definitely more than a minor inconvenience and yet another reason to strongly consider upgrading your PC and your OS to something more modern.

As things stand the clock is ticking for extended support for the OSes mentioned above. It won’t be long before you lose the protection offered by periodic security updates. Before that happens you need to be thinking in terms of steps to protect yourself and all your data regardless of where it lives.

Although it is highly inconvenient for people running those older Operating Systems it’s completely understandable that Microsoft is taking this stance. Though the company has deep pockets it also has a sprawling catalog of products to maintain. At a certain point they simply have to say goodbye to older applications. Upgrade before the clock runs out.

Used with permission from Article Aggregator

MANAGED IT SERVICES

CYBERSECURITY | HELPDESK | UPDATES | BACKUPS

Microsoft Patch Causing Network Issues on Windows 7 and Windows 2008R2 Systems

There is a known issue with Microsoft’s March Security Patch Rollup (KB 4088875), which is breaking the network connection for the device after the patch is installed and the device is rebooted.
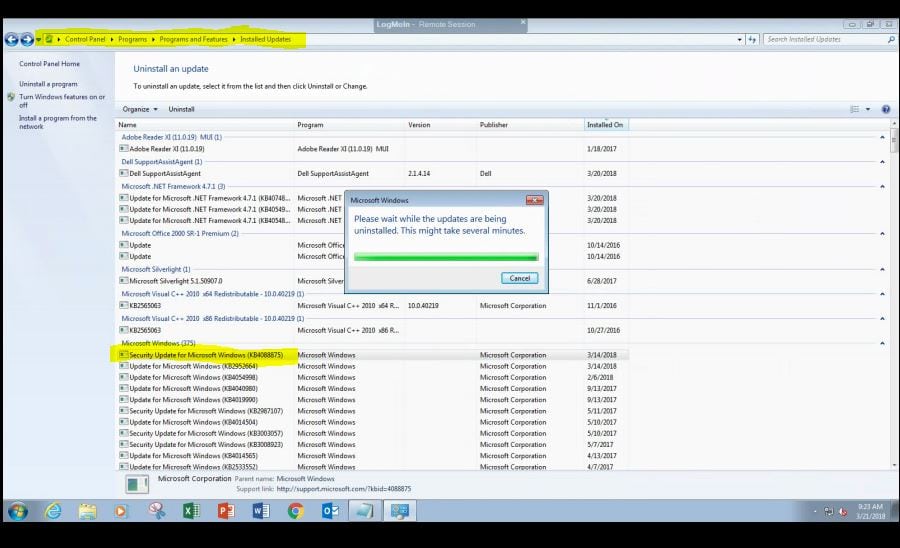
Microsoft has not yet officially acknowledged this issue or provided any steps for a fix. In the meantime, our team has been testing remediation steps for this issue. If this patch was installed and your device was rebooted, we recommend you take any of the following steps to restore the network connection:

  1. Manually update the network settings to revert back to the original configuration.
  2. If the machine has not yet been rebooted, you can uninstall the patch to avoid any issues
  3. Manually deploy a script, which was used to correct a similar issue in a previous patch rollup. More details here.

We will continue to monitor for any updates from Microsoft or if any new errors are discovered.

We have immediately globally blacklisted this patch for our Managed IT Service Customers to prevent this from being installed on all resources until we receive further information from Microsoft.


Remove The Update Before It Breaks Your Network Adapter

Outlook 2013 | 2010 – Export Auto Fill / Auto Complete data

This document will assist with the locating and saving a AutoFill / AutoComplete file in Outlook 2013.

Note: This document will help you locate the auto complete Stream_Autocomplete file associate with your Outlook account, for outlook 2010 and Outlook 2013 using Windows 7 and 8/8.1. The path where the file is stored is C:\Users\*username*\AppData\Local\Microsoft\Outlook\RoamCache. Below are directions on how to find this file.

*Show Hidden Files and Folders*

How to locate and save the “Auto Complete file” in Outlook 2010/2013 for Windows 7/8.1.

    1. Open Start Menu.
      • Win 7: Select the Windows Start Button.
      • Win 8/8.1: Press the Start Button on your keyboard to launch the Windows 8 tile menu or hover your cursor toward the lower left corner of your window to make the Start Button appear.
Windows 7 Windows 8/8.1
Windows7Startbutton Windows 8 Start button
    1. Double-click on Computer if using Windows 7, for Windows 8/8.1 users type Computer and select the Computer tile
      • Windows 7

Windows 7 Computer folder

      • Windows 8/8.1

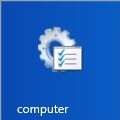
Computertile

    1. Double-click on Local disk C:

Windows 8 Local Disk C

  1. Double-click on Users folder.

Users folder

    1. Double-click on Username of the target user.

Users Profile

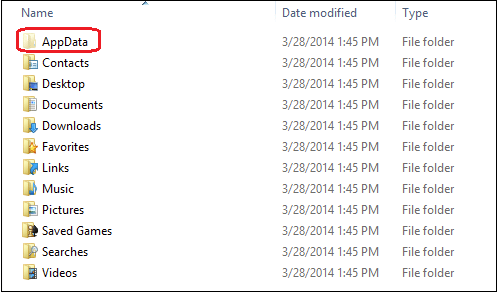
    1. Double-click on the AppData folder.
      • Must have administrative privileges

AppData folder

    1. Double-click on the Local folder.

Local folder

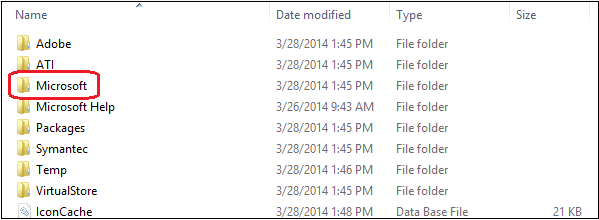
    1. Double-click on Microsoft folder.

Microsoft folder

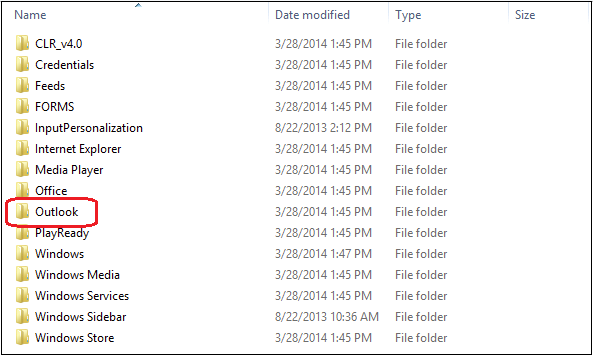
    1. Double-click on Outlook.

Outlook folder

    1. Double-click on RoamCache.

RoamingCache folder

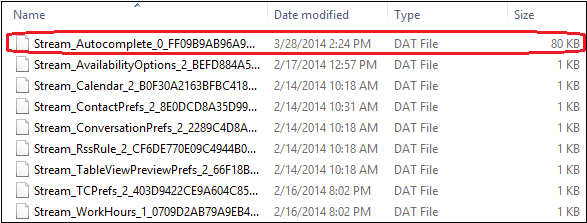
    1. The file that starts with Stream_Autocomplete_**** contains the Autocomplete file used in Office 2013.

Stream_AutoComplete File>

  1. Save this file to a flash drive or other media target and use it to import the Auto Complete names into another Outlook 2013 account.
  2. To import first rename any existing autocomplete file to autocompletexxx.old Then you must rename the newly imported file to match the existing file name in the target location.

Windows 7 & 8 – Show Hidden Files and Folders

This document will explain how to show hidden files and folders on your hard drive file system.


CAUTION: Windows stores many important settings in hidden files and folders. Do not modify or delete hidden files if you do not know precisely what will happen as a result. We assume no liability for data loss that occurs as a result of this procedure.


Procedure

  1. Access the Control Panel.
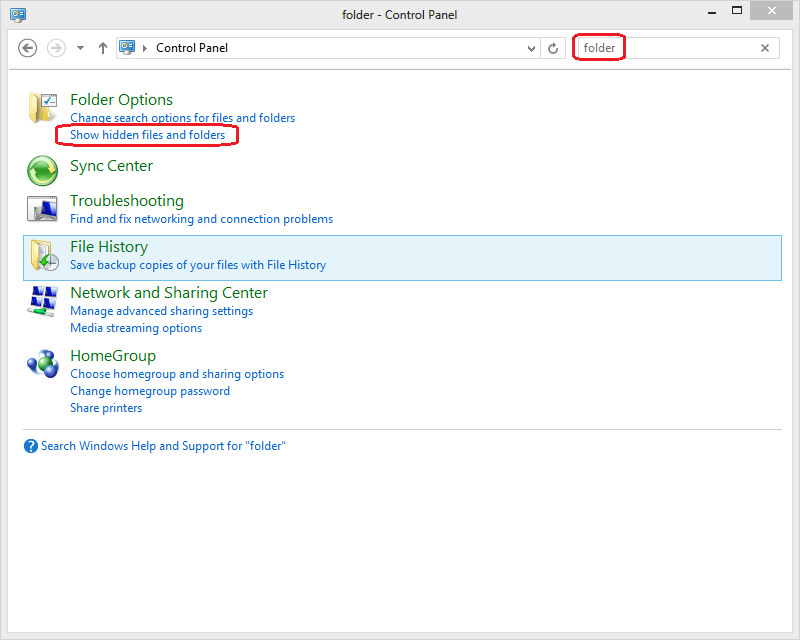
  2. Type “folder” into the search bar and select Show hidden files and folders.Win8 Folder
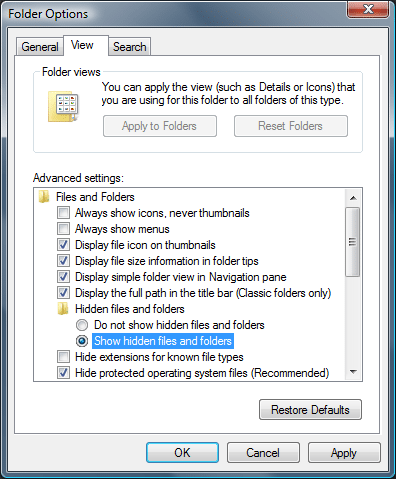
  3. Then, click on the View tab at the top of the window.
  4. Under Advanced Settings, locate “Hidden files and folders.” Select Show hidden files and folders just below that.folderOptions.png
  5. Click on OK.
  6. Hidden files will now be shown when performing searches in Windows Explorer.
    • Note: Hidden files will be greyed out. This is merely to indicate that they are a hidden file. You can still use them as though they were a normal file.

www.TMDTechnology.com