Skip to content

Author: TMD Technology

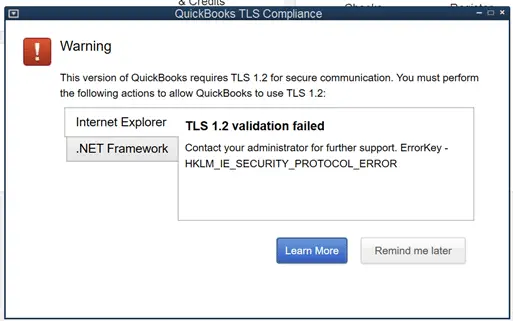
How do I Fix “TLS 1.2 validation failed” error in Quickbooks Pro 2015?

Are you getting a TLS 1.2 Error After Installing Windows 10 April 2018 Update

ErrorKey – HKLM_IE_SECURITY_PROTOCOL_ERROR

Checking off TLS 1.2 in IE probably wont help but luckily there is a fix available.

  1. First, close out of your QuickBooks Desktop application.
  2. Proceed to the second step which is running the TLS 1.2 Readiness tool. This tool helps in updating your system to become TLS 1.2 compliant, so it meets all Windows Operating System, Internet Explorer and .Net requirements. This tool is available from Intuit.
  3. Finally reopen your QuickBooks Application again and your error should be gone.

Please take note that QuickBooks Desktop 2015 is no longer supported by Intuit. You may receive errors when updating the program and eventually may have other issues.

What is TLS? – Transport Layer Security Protocol

Schannel supports versions 1.0, 1.1, and 1.2 of the Transport Layer Security (TLS) protocol. This protocol is an industry standard designed to protect the privacy of information communicated over the Internet. TLS assumes that a connection-oriented transport, typically TCP, is in use. The TLS protocol allows client/server applications to detect the following security risks:

  • Message tampering
  • Message interception
  • Message forgery

The full specification of the TLS Protocol is available from the IETF website: http://www.ietf.org/rfc/rfc2246.txt.

Quickbooks 2018 Shows Past Due on All Invoices

New Quickbooks Invoice past due stamp feature

Quickbooks 2018 v.18 now shows past due on all invoices on your screen.  Don’t panic, by default this will not print on the invoices you’re sending to your customers. While many people will find this annoying at first, showing a “Past Due” stamp helps you identify these invoices so you can take action and minimize delayed collection of dues.  I do think that Quickbooks should have a toggle switch to turn off this feature if unwanted but until then rest assured your customer will not get this stamp unless you want them to.

If you want to show the Past Due stamp on printed invoices

You can also email and print these invoices with the stamp to send to your customers.

Important: The Past Due stamp can only be turned on or off on a template level setting.

Add the Past Due stamp on invoices

Note: There are different ways to add the Past Due stamp.

Add the Past Due stamp from the Templates list

  1. Go to Lists > Templates.
  2. From the list, find and edit the invoice template you use for collections.
  3. From the Company & Transaction Information section, check the box Print Past Due Stamp.
  4. Click OK.
  5. Open an invoice that is past its due date. The PAST DUE stamp shows on the invoice.
  6. You may print the invoice or send it through email.

Add the Past Due stamp directly from the invoice

  1. Open an invoice past its due.
  2. Click Formatting and click Manage Templates.
  3. Select the invoice template you want to use and click OK.
  4. From the Company & Transaction Information section, click to check the box Print Past Due Stamp.
  5. Click OK.
  6. You may print the invoice or send through email with the PAST DUE stamp.

Turn off the Past Due stamp

  • If you are on the Basic Customization window, click to uncheck the Print Past Due Stamp box.
  • If you have the past due invoice open, simply click the Turn Off link to remove the Past Due stamp.

Hurricane Season 2018 is Almost Here, Are You Ready?

Hurricane Office Protection

The 2018 Atlantic Hurricane Season runs from June 1 to Nov. 30, and this year includes the names: Alberto, Beryl, Chris, Debby, Ernesto, Florence, Gordon, Helene, Isaac, Joyce, Kirk, Leslie, Michael, Nadine, Oscar, Patty, Rafael, Sara, Tony, Valerie, and William.

As we in South Florida look towards the horizon of another above average storm season, (according to forecasters from the Colorado State University Tropical Meteorology Project.) We should pause for a moment and reflect on last year’s disastrous hurricane season that included storms like Harvey, Irma and Maria.  These storms absolutely devastated so many of our neighbors in the caribbean and throughout the keys.  We were extremely lucky here in Palm Beach and Broward County and still many businesses suffered from extended periods of downtime due to power and internet outages.  If you own a business you should be putting some safeguards in place NOW while there is still time to prepare.

Consider the following items ahead of this hurricane season.

  • Prepare. Update your Hurricane and Disaster Plans. Being prepared is half the battle.
  • Redundancy.  Consider adding backup systems and alternatives to get back in operation quicker.  Generators, Wireless Internet Hotspots & Routers are great and relatively inexpensive options you can put in place and have ready year round.
  • Backup.  It goes without saying that having reliable data backup is crucial at anytime not just during a storm.  If you don’t have nightly backups and/or cloud back services you are putting your business at jeopardy.  Viruses, Malware,  Ransomware and mechanical failure are all almost inevitable at some point.  Reduce your risk and backup at a minimum daily.
  • Cloud. There are lots of cloud services out there that will help facilitate continued operations from remote locations.  We can quickly help migrate your email and even file storage to safe online storage using Office 365.
  • Support. Consider a monthly support agreement as this provides the best way to document your systems and recover after a disaster.  You will also receive the best support and proactive management all year long!
  • Don’t Wait! Most computer support and technology companies will be overrun addressing their current customers needs both ahead of and after a storm passes with little time available for new customers.

Call TMD Technology Services today to discuss how you can better prepare your business ahead of hurricane season. (561) 404-9251

Microsoft Patch Causing Network Issues on Windows 7 and Windows 2008R2 Systems

There is a known issue with Microsoft’s March Security Patch Rollup (KB 4088875), which is breaking the network connection for the device after the patch is installed and the device is rebooted.

Microsoft has not yet officially acknowledged this issue or provided any steps for a fix. In the meantime, our team has been testing remediation steps for this issue. If this patch was installed and your device was rebooted, we recommend you take any of the following steps to restore the network connection:

  1. Manually update the network settings to revert back to the original configuration.
  2. If the machine has not yet been rebooted, you can uninstall the patch to avoid any issues
  3. Manually deploy a script, which was used to correct a similar issue in a previous patch rollup. More details here.

We will continue to monitor for any updates from Microsoft or if any new errors are discovered.

We have immediately globally blacklisted this patch for our Managed IT Service Customers to prevent this from being installed on all resources until we receive further information from Microsoft.


Remove The Update Before It Breaks Your Network Adapter

Set up 2-step verification (MFA) for Office 365

User Instructions to set up 2-step verification for Office 365

To enhance security we will be adding 2-step verification (also called multi-factor authentication or MFA) to our email system. You will have to set up your account to use it.

By setting up 2-step verification, you add an extra layer of security to your Office 365 account. You sign in with your password (step 1) and a code sent to your phone (step 2).

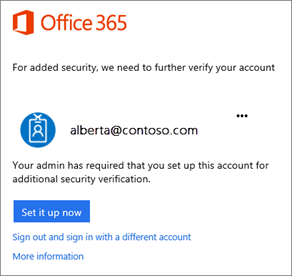
  1. Sign in to Office 365 with your work or school account with your password like you normally do. After you choose Sign in, you’ll see this page:

First Sign in screen

  1. Choose Set it up now.
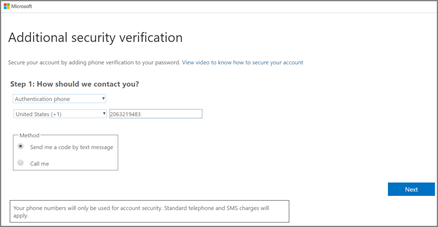
  2. Select your authentication method and then follow the prompts on the page. Or, watch the video to learn more.

Choose your authentication method and then follow the prompts on the screen.

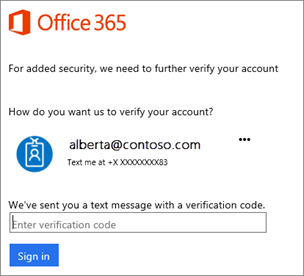
  1. Once you complete the instructions to specify how you want to receive your verification code (We suggest Authentication phone and Send me a code by text message), the next time you sign in to Office 365, you’ll be prompted to enter the code that is sent to you by text message, phone call, etc. To have a new code sent to you, press F5.

    When you sign in with 2-step verification, you'll be prompted for a code.

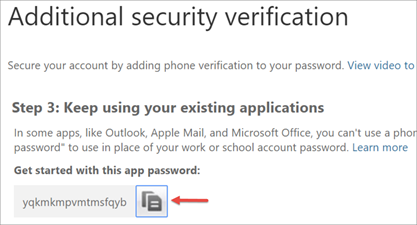
  2. You’ll get an app password that you can use with Outlook, Apple Mail, your Android or Iphone, etc. Choose the copy icon to copy the password to your clipboard. You won’t need to memorize this password but be sure to capture it (take a picture or write it down) because you will not have the opportunity to see it again.

    Image of the copy icon to copy the app password to your clipboard.

Next steps

If you’re using other apps like Outlook on your desktop, you’ll need to to use this app password or you can create a new app password so they can connect to your Office 365 account.

Skip to content