3 Tips to Help Acclimate to Windows 10

windows-10-logoHere are 3 Quick Tips to help navigate Windows 10, without losing productivity:

1. The Start Menu

For you Windows 7 users, rest easy, because this is here to stay. For the Windows 8 users, the start menu is back with its full functionality – and then some. The aesthetics of the new start menu combine the basics of the start menu from Windows 7 with the sleek tiles that were a part of Windows 8. The customization of this helps you to access what you need much faster and boosts productivity. Open the Start Menu, click on Settings, Personalization, and then Start. Make the Start Menu work for you.

2. Microsoft Edge

Although this is the new web browser, do not worry – Internet Explorer 11 will be available by default in your upgrade. It is worth noting that many business applications remain untested with Microsoft Edge. If you find that Microsoft Edge is popping up as your default browser, this article will help you with that. Remember that super awesome Start Menu we spoke about above? Click in the search bar right next to it, and type “Default Programs.” Open that up, find Internet Explorer on the left, and click on it. There will now be an option to click that states “Set this program as default.”

3. Search Enhancements

Find anything on your PC. No, really. On the bottom left, to the right of the Start Menu, type a term in that search box. If it doesn’t automatically populate, click on the “My Stuff” icon on the bottom of that pop-up window. Your machine will be scanned for files, applications, pictures – just about anything – containing any or all of that search term within that file name. Don’t catch yourself drilling down through menus trying to find something. Don’t waste your time digging and trying to find that one file you thought you’d never need again. Use this search function to help save time.

www.TMDTechnology.com

Here are five reasons you might want to hold off a Windows 10 upgrade

Windows-10-LogoWindows 10 is just about here and many users are ready to ditch windows 7 or 8 and upgrade.  Here are five reasons you might want to hold off a Windows 10 upgrade.

  1. Your system hardware doesn’t support it

This is pretty obvious, but you need to really consider your SPECs. In order to run Windows 10, you need a PC or tablet with a 1GHz processor or faster, 1GB of RAM for 32-bit machines or 2GB for 64-bit machines, 16GB hard disk space for 32-bit machines or 20GB hard disk space for 64-bit machines, a DirectX 9 or later graphics card with a WDDM 1.0 driver and an 800 x 600 display or better. If your system doesn’t meet the SPEC then you’re going to have to upgrade your hardware before you upgrade your operating system. If this is the case it is probably more economical to just buy a new computer with Windows 10 already installed.

  1. You’re using Windows 7

Windows 10 corrects many of the issues in Windows 8, an operating system that was built more for touch devices than Desktop PCs. Two of Windows 10’s big improvements over Windows 8 are the addition of a Windows 7-style Start menu and the ability to work entirely on the desktop and ignore the touch-focused (Metro) Start screen.  If you currently use Windows 7 then you have a Start menu and work only on the desktop. If you’re happy with the way Windows 7 works, we would probably tell you to stay with it.

  1. Security updates for Windows 7 and Windows 8 are still available

Microsoft has a habit of pushing people to its latest operating system by ending support for its old operating systems, halting security updates and leaving users potentially open to security threats. If you have Windows 7 or Windows 8, you’ve got years before that happens. Microsoft will keep issuing security patches for Windows 7 until January 2020 and for Windows 8 until January 2023. So there is no need to rush if security updates are your concern.

  1. You have old printers or other peripherals

Many new operating systems are not designed to work with older peripherals, such as printers and scanners. Microsoft doesn’t always make sure that drivers for older devices work with their newest operating system. It simply takes too many development resources to try to ensure all devices work. As a result, some of these peripherals won’t work with Windows 10.

  1. Live on the cutting edge not the bleeding edge.

Beta testing a new operating system never uncovers all the bugs and gotchas that people are going to encounter. A new operating system hasn’t been tested on every possible piece of hardware, with every piece of software, and with every hardware/software combination. People who upgrade immediately are the guinea pigs and often the ones that get burned.  We suggest you wait another six months before you upgrade.

Don’t worry about missed opportunity….Qualified Windows 7 and 8 users get a free upgrade to Windows 10 and you have a full year from release (July 29, 2015.) so you can upgrade at your convenience.

Call today to discuss how windows 10 may fit your organization.

www.TMDTechnology.com


The countdown has begun- Support for Microsoft Windows Server 2003 ends July 14, 2015.

server-2003There is no better time than now to migrate. Only 3 months left until support for Windows Server 2003 ends. After July 14th, 2015, there’s no more support for the aging operating system and no more peace of mind for anyone still running Windows Server 2003. What are you waiting for? The average server migration takes months to plan, execute, and properly test and Dell can help you make this process as seamless as possible.

How does this impact your business?

  • No updates – Microsoft released 37 critical updates in 2013 for Windows Server 2003/R2. After End of Support, these updates will be discontinued.
  • No compliance – Windows 2003 servers may not pass compliance audits (lack of PCI compliance could mean that Visa and MasterCard will no longer do business with your organization).
  • No safe haven – Both physical and virtualized Windows Server 2003 instances are impacted. Running Windows Server 2003 increases operations costs. Many application providers will discontinue support for their applications when running on Windows Server 2003. Microsoft Small Business Server 2003 Support is also ending at the same time.

Don’t put your business at risk!  Call us today to plan your upgrade! (561) 404-9251

TMDTechnology.com

Install Skype for Business (Lync)

Install Skype for Business (Lync) on your Windows computer

First make sure Skype for Business (Lync) isn’t already installed.

  • Go to Start > Microsoft Office 2013 (Windows 7) or Start > Office 365 (Windows 8), and look for Skype for Business (Lync). If Skype for Business (Lync) is installed, you’re ready to go.

If Skype for Business (Lync) isn’t installed:

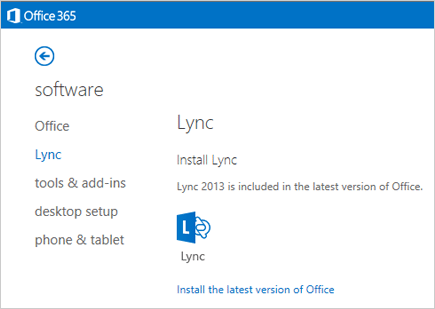
  1. Sign in to Office 365 with your work or school account.
  2. Go to Settings Office 365 setttings button - looks like a gear next to your name > Office 365 Settings.
  3. Choose Software > Skype for Business (Lync).

officeskype

Keep in mind:

  • Skype for Business (Lync) may already be installed on your computer as part of Office 365.
  • If Skype for Business (Lync) isn’t listed, contact your workplace technical support to make sure your account includes the Skype for Business (Lync) Online service.

Install Skype for Business (Lync) on your mobile device

Go to your app store and search for Lync 2013. For details, see the Getting Started guide for your device at Microsoft Lync 2013 for Mobile Clients.

Install Skype for Business (Lync) on your Mac

If your organization installed Office for Mac Standard 2011 on or after October 1, 2011, then you already have Lync for Mac 2011.

How to turn on “Automatic Replies (Out of Office)” or the “Out of Office Assistant”

For Outlook 2013 and Outlook 2010

  1. Click the File tab, and then click the Info tab in the menu.

    Outlook File Menu Snapshot

  2. Click Automatic Replies (Out of Office).

    Outlook 2013 Out Of Office feature Snapshot

    Note If you do not see this option, you are not using an Exchange account. Please go to this section: How to enable Automatic Replies in non-exchange account.

  3. In the Automatic Replies dialog box, select the Send Automatic Replies check box.
  4. If you want to specify a set time and date range, select the Only send during this time range check box. Then set theStart time, and then set the End time.
  5. In the Inside my organization tab, type the message that you want to send within your organization, and in theOutside my organization tab, type the message that you want to send outside your organization.
  6. Click OK.
  7. If you selected the “Only send during this time range” option in step 4, the Automatic Replies (Out of Office) feature will continue to run until the date and time set for the End Time in step 5 is reached.
    Otherwise, the Automatic Replies (Out of Office) will continue to run until you repeat step 1 and select the “Do not send automatic replies” option.

Need assistance with accessing your email remotely?  Call us  TMDTechnology.com