How to remove an Android default app setting

So you’re using your Android phone (Not while driving down the road of course) and you tap on a link in an email or download an attachment and the phone pops up a dialog box asking you which app you’d like to use to complete the action. If you select the wrong app and hit the Always button in that dialog box, you will probably be stuck opening all of your PDFs or word docs in the wrong viewer indefinitely. It’s pretty easy to change the default app for launching different types of URLs and files.

When you first launch a file or link, that’s when you will either be prompted to choose an app or taken directly to the app it’s already associated with. Different types of URLs and file attachments can be assigned to different apps, so tapping on a PDF file can launch the Amazon app instead of Adobe or any other slew of viewers. If you’ve accidentally selected the wrong default app for something, you can remove that setting so Android prompts you to make a choice again the next time you launch that file/link.

How to remove an Android default app setting

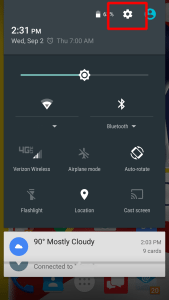
1. Navigate to Settings on your Droid. You can launch Settings by tapping its shortcut in the apps menu or pulling down the notification drawer and tapping on the Settings icon (Usually a gear).

How to change the default app in Android

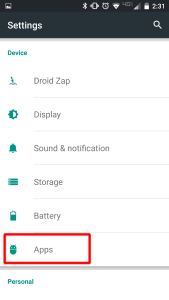
2. Enter the Apps menu. On some phones it will be called Application Manager or something along those lines.
How to change the default app in Android
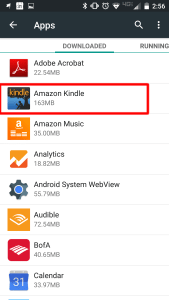
3. Select the App you want to work with (You may need to swipe over to the All apps list).
How to change the default app in Android
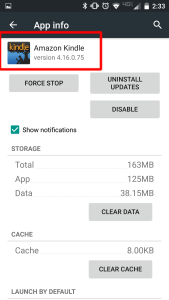
4. Select the app you want to remove as default. In this scenario we don’t want Amazon opening our PDf files
How to change the default app in Android
5. Tap Clear Defaults. (Note if it’s grey then it is not set as a default app)
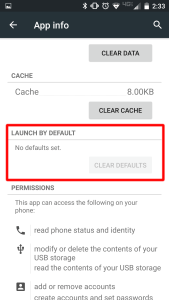
How to change the default app in Android
After clearing defaults the next time you launch the link/file type that apps was associated with, you will be prompted to choose a default app again.

Another Option to see and clear default apps on android is to use a third party tool.

How to see a list of current default apps

Android doesn’t provide a complete list of file and link types but a third-party app called Default App Manager provides a list of current defaults and helps you set defaults for many of the apps.

The app has two tabs: Category and All Defaults.

The Category Wise tab shows general categories such as Browser, Calendar, Camera and email along with the name of whatever app is currently set as default for them. If a file type has no associated app, Default App Manager will list it as having no default.


To set or change a default app in Default App Manager:

1. Tap a category (example: Email).
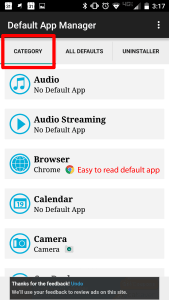
how to change Default android app

2. Tap Clear Default to remove the current app, if there is one. You will then be transported to Android’s built-in app menu, where you have to tap Clear Defaults for that app and then hit the back button to return to Default App Manager.

3. Tap Set Default. A dialog box will appear asking you to complete the action.

4. Select the app you want and tap Always.

The categories don’t include granular links such as URLs, which could potentially launch their own apps (ex: Amazon).

The All Defaults tab in Default App Manager shows all default apps, no matter which category the app is associated with giving you more granular control. You can use this option to change an app’s defaults by tapping the Clear button.  This will take you to that app’s info screen where you can hit the Clear Defaults button.
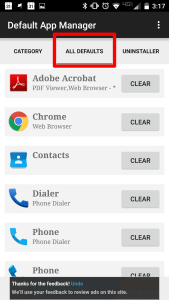
Default android app

www.TMDTechnology.com

How to set up email on an Android phone or tablet

PhoneDroidYou can connect to your Office 365 or other Exchange-based email on an Android phone or tablet. When you set up an Exchange account on your Android, you’ll be able to access and synchronize your email, calendar, and contacts. If you only want to use email, you can set up POP or IMAP email on an Android. If you have a different device, see Phone and tablet setup reference. If you’re having trouble connecting your device after following these steps, see What else to I need to know? at the end of this article.

NOTE If you have an Office 365 email account see Use Office 365 on your Android Phone for detailed information about how to use Office 365 on your phone or tablet.

Set up Microsoft Exchange email on an Android

  1. From the Applications menu, select Email. This application may be named Mail on some versions of Android.
  2. Type your full email address, for example tony@contoso.com, and your password, and then select Next.
  3. Select Exchange account. This option may be named Exchange ActiveSync on some versions of Android.
  4. Enter the following account information and select Next.
  • Domain\Username Type your full email address in this box. If Domain and Username are separate text boxes in your version of Android, leave the Domain box empty and type your full email address in the Username box.

NOTE On some versions of Android, you must use the domain\username format. For example, if your email address is tony@contoso.com, type contoso.com\tony@contoso.com. Your username is your full email address.

  • Password Use the password that you use to access your web Office 365 account.
  • Exchange Server Use the address of your Exchange server. If you’re connecting to your Office 365 email, use outlook.office365.com for your server name. If you are not using Office 365, see Find your ActiveSync server name later in this article.
  1. As soon as your phone verifies the server settings, the Account Options screen displays. The options available depend on the version of Android on your device. The options may include the following:
  • Email checking frequency The default value is Automatic (push). When you select this option, email messages will be sent to your phone as they arrive. We recommend only selecting this option if you have an unlimited data plan.
  • Amount to synchronize This is the amount of mail you want to keep on your mobile phone. You can choose from several length options, including One day, Three days, and One week.
  • Notify me when email arrives If you select this option, your mobile phone will notify you when you receive a new email message.
    Sync contacts from this account If you select this option, your contacts will be synchronized between your phone and your account.
  • Select Next and then type a name for this account and the name you want displayed when you send e-mail to others. Select Done to complete the email setup and start using your account.

NOTE You may need to wait ten-to-fifteen minutes after you set up your account before you can send or receive e-mail.

Find your Exchange ActiveSync server name

If your email program isn’t able to automatically find your Exchange ActiveSync server name, you may need to look it up.

If you’re connecting to your Office 365 email, use outlook.office365.com as your Exchange ActiveSync server name.

If you’re connecting to an Exchange mailbox, but aren’t using Office 365, or if you aren’t sure if you’re using Office 365, follow these steps to look up your Exchange ActiveSync server name.

  1. Sign in to your account using Outlook Web App.
  2. If you’re connecting to an Exchange mailbox, but aren’t using Office 365, your Exchange ActiveSync server name is contained in address bar in your browser when you are signed in to Outlook Web app – -but without the leading https:// and without the trailing /owa. For example, if the address you use to access Outlook Web App is https://mail.contoso.com/owa, your Exchange ActiveSync server name is mail.contoso.com.
  3. If you’re unable to connect to your mailbox using the information earlier in this section, you can try the server name value that displays in Outlook Web App options.
    In Outlook Web App, from the toolbar, click Settings Gear Icon > Options > Account > My account > Settings for POP and IMAP access.

NOTE Although you’re not setting up a POP3 or IMAP account, you’ll use the POP server name to determine your Exchange ActiveSync server name.

  1. Under POP setting, look at the value for Server name.
  • If the Server name value is outlook.office365.com, your account is an Office 365 account, and you can use outlook.office365.com as your Exchange ActiveSync server name.
  • If the Server name value is not outlook.office365.com, you can try using the server name listed on your options page. For example, if the server name is mail.contoso.com, try using mail.contoso.com as your Exchange server name.

That Should Do it!  Email should begin to flow.  You may be prompted to use a password on your phone if your administrator has put those policies in place.

Call TMD Technology Services for additional Computer and Phone Support.

Headquartered in Delray Beach, FL.